Accessing the Credit Management Screen
To view Credit Management, access it via the side menu under the option: Enrollment > Use Limit Management.

Filtering a Credit
Use the Active filter located at the top of the screen to filter. The available options are:
-
All: Shows all registered credits.
-
Active: Lists only the credits that are active.
-
Inactive: Displays the credits that have been deactivated.
Searching for a Credit
In the Search field, type part of the person's name, visitor's name, or the type of credit you want to find. The results matching your search will automatically be displayed in the list.
Managing a Credit
To manage a new adjustment, click on the Credit Adjustments button.
You can manage credits in two ways:
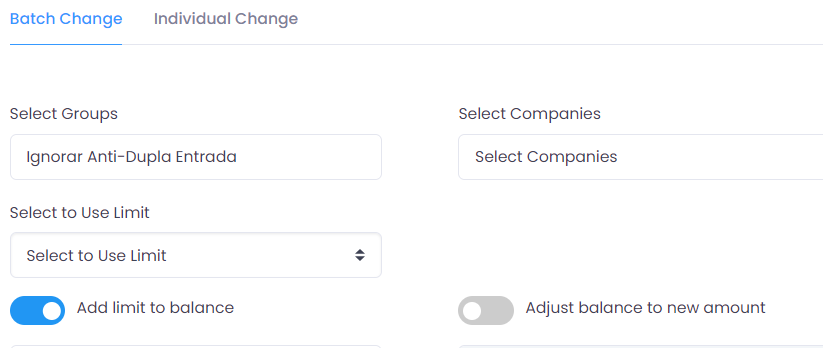
- Batch Change: In this tab, you can manage credits in bulk by selecting a group or company. This way, the credit will be applied to all people and visitors associated with the chosen company or group.

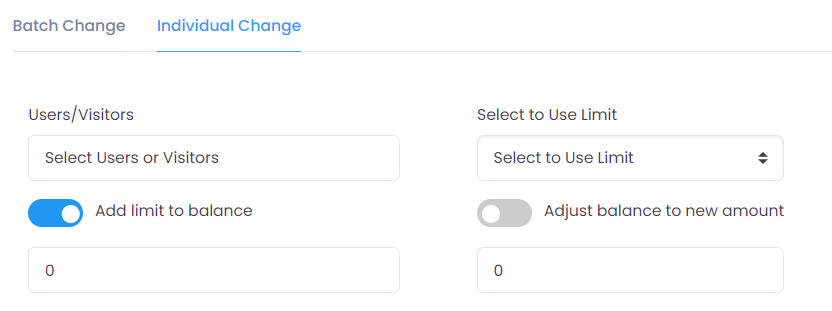
- Individual Change: In this tab, you can manage credits individually by selecting a specific person or visitor.

The process of registering a new credit adjustment is easy and quite similar in both tabs. Just follow the steps below:
- Select who will receive the credits, whether Groups and/or Companies in the batch adjustment or People and Visitors in the individual adjustment.
- Choose the Credit Type from the available list.
- Add the credit amount by filling in the corresponding numeric field.
- Use the toggles:
- Add Credit to Balance: When activated, it adds the credits to the existing credit balance for the person or visitor.
- Adjust Balance to New Value: When activated, it adjusts the credit balance of the person or visitor to a new value, which must be entered in the numeric field below the toggle.
Editing a Credit
To edit an existing credit adjustment, click the Pencil icon corresponding to the record you want to modify.
You will be redirected to the Edit Screen, where you can modify the necessary information.
Deactivating or Deleting a Credit
Click the Trash icon on the row of the record you want to deactivate or delete.
A dialog box will appear with two options:
-
Inactive: Deactivates the selected credit adjustment, which will no longer be displayed in the active list but will remain in the database.
-
Permanently delete: Performs a 'fake delete,' marking the record as deleted in the database without physically removing it.
Activating a Credit
Activating an inactive record is a simple process. First, filter by Inactive. This will display the list of credits that are inactive.
Locate the record you want to activate and click the ✔️ icon to activate it.
A dialog box will appear to confirm or cancel the operation.
Selecting the Number of Records Displayed
At the bottom of the screen, use the selector to choose how many records you want to view at a time. The options are: 10, 20, 50, and 100.
Viewing and Navigating Between Records
The bottom of the screen also shows the count of displayed records and the total number of registered records.
Use the pagination controls to navigate between the record pages. The navigation options include:
- <<and >> to go to the First or Last page.
- <and > to Advance or Recede one page.
- [1] [2] ... [N] page indicators to click and access directly.

Saving Credit Information
After filling in all the information, click the Save button to confirm the registration or edits.
If you wish to cancel the operation, click the Cancel button to return to the previous screen without saving the changes.
