Accessing the Parking Areas List Screen
To view the parking areas registered in the system, access it via the side menu under the option: Records > Parking Areas.

Filtering Parking Areas
Use the Active filter located at the top of the screen to filter parking areas. The available options are:
-
All: Shows all registered parking areas.
-
Active: Lists only the parking areas that are active.
-
Inactive: Displays the parking areas that have been deactivated.
Searching Parking Areas
In the Search field, type part of the parking area name you want to find. The results matching your search will automatically be displayed in the list.
Adding a New Parking Area
To add a new parking area, you can:
- Click the Add Parking Area button.
- Or click the + (plus) icon located in the header of the screen.
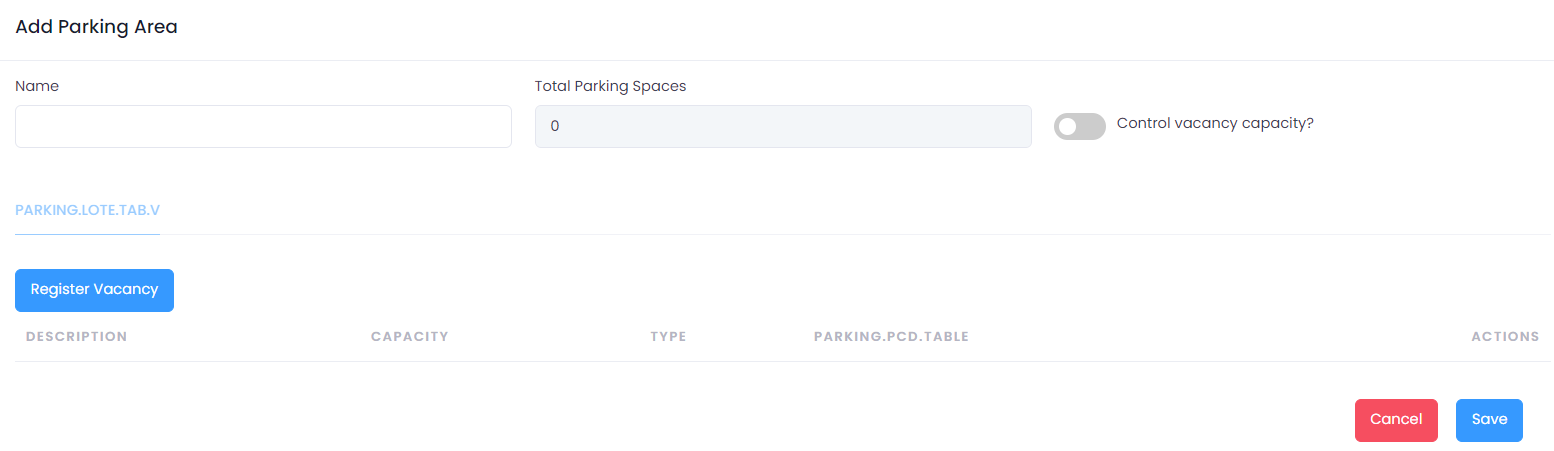
When registering or editing a parking area, fill in the following information:
- Name: The parking area identifier (required).
Editing a Parking Area
To edit an existing parking area, click the Pencil icon corresponding to the record you want to modify.
You will be redirected to the Edit Screen, where you can modify the necessary information.
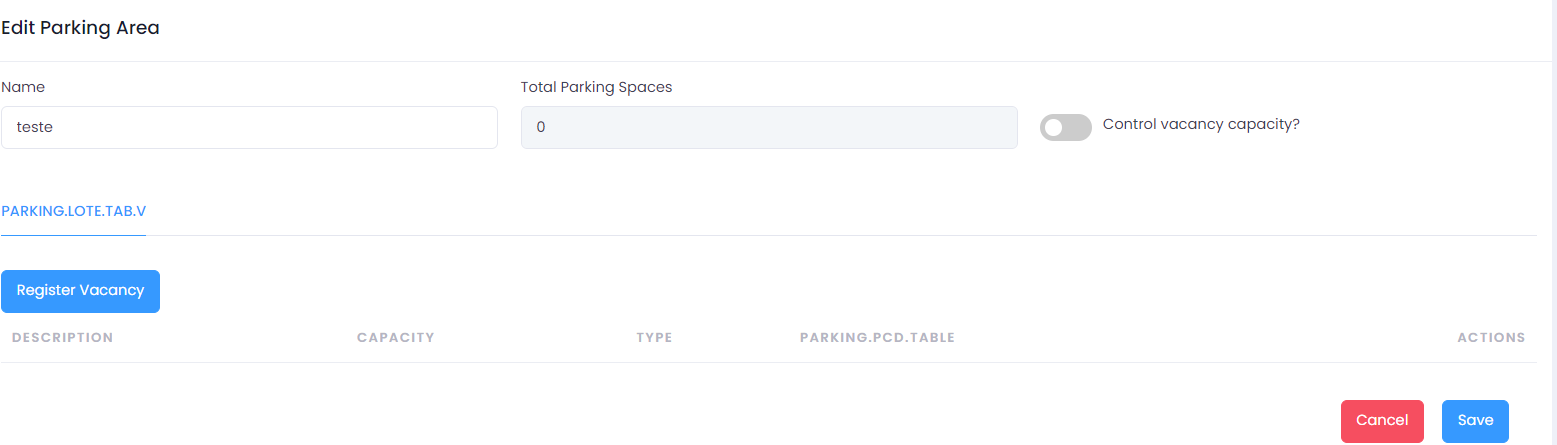
Registering or Editing Parking Spaces
The parking space control will be available when adding a parking area or editing an existing parking area.
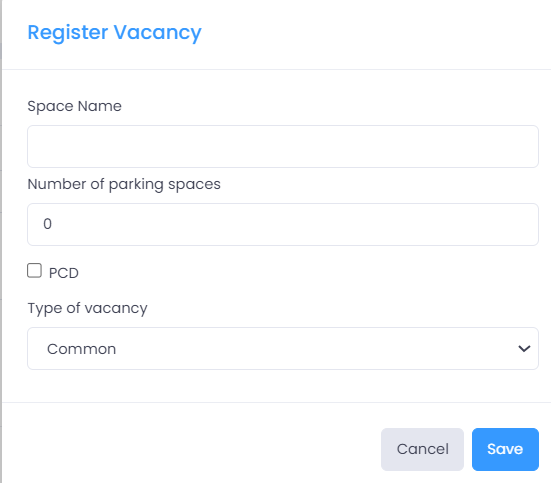
Adding a Space
Click the Register Vacancy button and fill in the fields:
- Space Name: Enter the identifying name of the space. For example, "Space 01", "Covered Space A," etc.
- Number of spaces in the parking area: Indicate the number of spaces available in this area. If it's a single space, leave it as
1.
Configuring Space Accessibility
- PCD: Check this box to indicate that the spaces in this area are designated for People with Disabilities (PCD). PCD spaces are counted separately from the general total for reporting purposes.
Selecting the Space Type
Click the dropdown menu to select the type of space. The available options are:
-
Common: A standard space available for any parking user.
-
Personal: A space reserved for a specific individual or entity. You will need to select a person registered in the system.
-
Company: A space designated for company vehicles or its employees. You will need to select a company registered in the system.
Saving Space Information
After filling in all the information and selecting the desired configurations, click the Save button to confirm the registration or edits made to the space.
If you wish to cancel the operation, click the Cancel button to return to the previous screen without saving the changes.
Deactivating a Space
Click the Trash icon on the row of the record you want to deactivate. A dialog box will appear: - Inactive: Deactivates the selected space, which will no longer be displayed in the list.

Deactivating or Deleting a Parking Area
Click the Trash icon on the row of the record you want to deactivate or delete. A dialog box will appear with two options: - Inactive: Deactivates the selected parking area, which will no longer be displayed in the active list but will remain in the database. - Permanently delete: Performs a 'fake delete', marking the record as deleted in the database without physically removing it.

Activating a Parking Area
Activating an inactive record is a simple process. First, filter by Inactive. This will display the list of parking areas that are inactive.
Locate the record you want to activate and click the ✔️ icon to activate it.
A dialog box will appear to confirm or cancel the operation.
Listing Registered Spaces
The spaces registered for a parking area are listed on the parking area screen. The information displayed in the listing includes: - Description: The name of the space - Capacity: Indicates the total number of spaces in that area - Type: Indicates the type of spaces in that area - PCD: Indicates whether the spaces in that area are for people with disabilities - Edit Action: Allows you to edit the registration of that parking area space - Deactivate Action: Allows you to deactivate the registration of that parking area space

Exporting the Parking Areas List
You can export the parking areas list to a CSV file. Use the available filters to refine the data before exporting, then click the export button to download the file.
Selecting the Number of Records Displayed
At the bottom of the screen, use the selector to choose how many records you want to view at a time. The options are: 10, 20, 50, and 100.
Viewing and Navigating Between Records
The bottom of the screen also shows the count of displayed records and the total number of registered records.
Use the pagination controls to navigate between the record pages. The navigation options include:
- <<and >> to go to the First or Last page.
- <and > to Advance or Recede one page.
- [1] [2] ... [N] page indicators to click and access directly.
